
My Server: https://n8n.ainet.biz

10,000 email in your inbox
Regain control of your Gmail InBox.
Processing 10,000 emails takes about 5 hours and costs $95.00 USD.
We need to set up OAuth access to your InBox.
Your Inbox will be moved and organized into a YEAR’S folder, with subfolders for each year and type folders for Work, Play, Junk, and Other. (e.g., YEARS/2025/Work, YEARS/2024/Play, etc).

managing Users
- Create a Google form for staff to apply for an email address/
- Create an auto spreadsheet from this form.
- Let N8N have access to this form.
- Run N8N.
- Staff User is created.
- Staff User is sent a login email
- Staff User is set up on your website

Setting up Google API
Before you can do any work with Google and N8N, you need to set up your APIs.
One-on-One Online
We provide one on one training, best done if you have a website with us.
Please make sure TeamViewer is installed.
Choose a time that suits you.
These times are from 2 PM to 5 PM Hawaii Time; you will see them in your Browser in your time zone.
You can book up to a day before.
Let’s partner.
Let me know what it is you would like to do.
Email address
tony@ainet.biz
My Server: https://n8n.ainet.biz
Granting OAUTH access to your INBOX aND mORE
✅ How to Set Up Google OAuth in n8n (using a Gmail account)
You must create a Google Cloud project and generate OAuth credentials. Here’s how:
1. Create a Google Cloud Project
- Go to Google Cloud Console:
https://console.cloud.google.com - Sign in with your gmail.com account.
- Click Select Project → New Project.
- Give it any name → Create.
This is most likely where you want to get us involved.
2. Enable the required APIs
Depending on what you want to connect (Gmail, Drive, Sheets, etc.):
- In the left menu, go to APIs & Services → Library.
- Search and enable:
- Gmail API
- Google Sheets API
- Google Docs API
- Google Slides API
- Google Calendar API
- Google Business API x4
- Google Drive API x2
- Google Maps & Geocoding API x3
- Google Natural Language API
- Google Cloud Storage API
- Google Admin API
- Google Analytics Admin API
- Google Gemini API (DO NOT TURN ON)
- (Enable whichever you plan to use with n8n)
3. Configure OAuth Consent Screen
- Go to APIs & Services → OAuth Consent Screen
- Choose External (since you’re using a regular Gmail account)
- Fill:
- App name (anything)
- User support email
- Developer email
- Scopes:
Add only what you need, e.g.:…/auth/gmail…/auth/drive…/auth/spreadsheets
- Test users:
Add your gmail.com email. - Save.
4. Create OAuth Client ID
- Go to Credentials → Create Credentials → OAuth client ID
- Application type: Web application
- Add Authorized redirect URIs:
IMPORTANT — FOR n8n
If you’re using n8n Cloud (their hosted service):
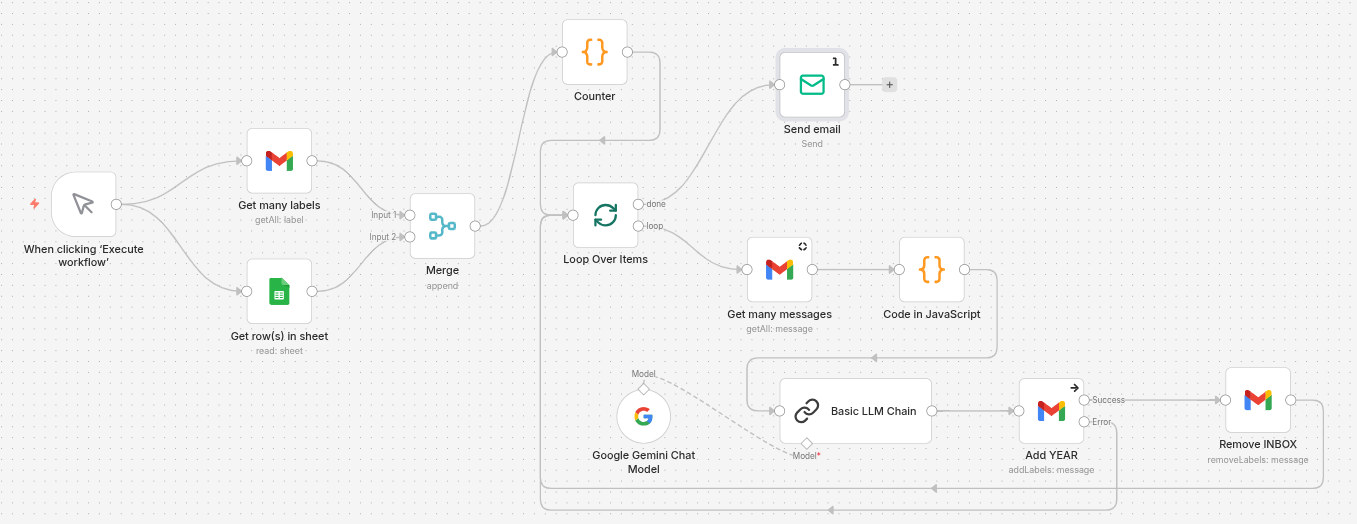
Cleaning out your InBox
Click Start
Click to start; later, we might schedule this to run every hour until complete.
Get Many Labels & Get Spreadsheet Rows
This is to ensure we have all the required labels and a list of the actual labels.
We could add error checking here if needed.
Merge
This is a useful Node that can perform several tasks and continue only when they are completed.
Counter
I needed a way to run only five cycles during testing, up to 1,000 in production.
Loop
We loop until the counter is full, then break out and send me an email with the number of emails processed.
Get many messages
We only get five messages, as this is what I have been told to work from.
Code
This code is to make the email friendly for the AI to look at.
Basic LLM Chain
This Node allows you to attach processing Nodes, such as a specific AI. In my case, I am connected to Google Gemini, and the credentials here are for the paid version at $0.10 per 1,000,000 tokens.
Add YEAR
The only thing that leaves the Basic LLM Chain is a Word: Work, Play, Junk, or Other.
We also feed in the Message ID from the Get many messages.
And the years that match the date of the Message.
This will give us a folder name like YEARS/2024/Work.
So long as there is no error, we now proceed.
Remove INBOX
Now we remove the INBOX label from the five email messages.
Rince and repeat.
With a counter set to 400, we will process 2,000 emails.
Making a Worker Queue for scheduled Workflows.
docker-compose.yml.- Added Worker Service: Since you are using
EXECUTIONS_MODE=queue, a dedicated worker is now included to pick up and execute the scheduled tasks. - Fixed Syntax Errors: Corrected the
${SMTP_SENDER}variable syntax (added the missing$). - Network Alignment: Ensured all services are explicitly on the same default network so they can communicate with Redis and Postgres.
- Security: Added a placeholder variable for
N8N_ENCRYPTION_KEYwhich is vital for queue mode consistency.
yaml
services:
  traefik:
    image: traefik:v3.6
    restart: always
    command:
      - "--api=true"
      - "--api.insecure=true"
      - "--providers.docker=true"
      - "--providers.docker.exposedbydefault=false"
      - "--entrypoints.web.address=:80"
      - "--entrypoints.web.http.redirections.entryPoint.to=websecure"
      - "--entrypoints.web.http.redirections.entryPoint.scheme=https"
      - "--entrypoints.websecure.address=:443"
      - "--certificatesresolvers.mytlschallenge.acme.tlschallenge=true"
      - "--certificatesresolvers.mytlschallenge.acme.email=${SSL_EMAIL}"
      - "--certificatesresolvers.mytlschallenge.acme.storage=/letsencrypt/acme.json"
    ports:
      - "80:80"
      - "443:443"
    volumes:
      - traefik_data:/letsencrypt
      - /var/run/docker.sock:/var/run/docker.sock:ro

  n8n:
    image: n8nio/n8n:latest
    restart: always
    depends_on:
      - postgres
      - redis
    ports:
      - "127.0.0.1:5678:5678"
    labels:
      - traefik.enable=true
      - traefik.http.routers.n8n.rule=Host(`${SUBDOMAIN}.${DOMAIN_NAME}`)
      - traefik.http.routers.n8n.tls=true
      - traefik.http.routers.n8n.entrypoints=web,websecure
      - traefik.http.routers.n8n.tls.certresolver=mytlschallenge
      - traefik.http.middlewares.n8n-headers.headers.stsSeconds=31536000
      - traefik.http.middlewares.n8n-headers.headers.stsIncludeSubdomains=true
      - traefik.http.middlewares.n8n-headers.headers.stsPreload=true
      - traefik.http.middlewares.n8n-headers.headers.contentTypeNosniff=true
      - traefik.http.middlewares.n8n-headers.headers.browserXssFilter=true
      - traefik.http.routers.n8n.middlewares=n8n-headers
    environment:
      - NODE_FUNCTION_ALLOW_EXTERNAL=axios,cheerio
      - NODE_FUNCTION_ALLOW_BUILTIN=url,url-parse,whatwg-url,dns/promises
      - N8N_HOST=${SUBDOMAIN}.${DOMAIN_NAME}
      - N8N_PORT=5678
      - N8N_PROTOCOL=https
      - WEBHOOK_URL=https://${SUBDOMAIN}.${DOMAIN_NAME}/
      - GENERIC_TIMEZONE=${GENERIC_TIMEZONE}
      - DB_TYPE=postgresdb
      - DB_POSTGRESDB_HOST=postgres
      - DB_POSTGRESDB_PORT=5432
      - DB_POSTGRESDB_DATABASE=${POSTGRES_DB}
      - DB_POSTGRESDB_USER=${POSTGRES_USER}
      - DB_POSTGRESDB_PASSWORD=${POSTGRES_PASSWORD}
      - N8N_USER_MANAGEMENT_JWT_SECRET=${N8N_JWT_SECRET}
      - N8N_EMAIL_MODE=smtp
      - N8N_SMTP_HOST=${SMTP_HOST}
      - N8N_SMTP_PORT=${SMTP_PORT}
      - N8N_SMTP_USER=${SMTP_USER}
      - N8N_SMTP_PASS=${SMTP_PASSWORD}
      - N8N_SMTP_SENDER=${SMTP_SENDER}
      - N8N_SMTP_SSL=${SMTP_SSL}
      - EXECUTIONS_MODE=queue
      - QUEUE_BULL_REDIS_HOST=redis
    volumes:
      - n8n_data:/home/node/.n8n
      - /local-files:/files

  n8n-worker:
    image: n8nio/n8n:latest
    command: worker
    restart: always
    depends_on:
      - n8n
      - redis
      - postgres
    environment:
      - NODE_FUNCTION_ALLOW_EXTERNAL=axios,cheerio
      - GENERIC_TIMEZONE=${GENERIC_TIMEZONE}
      - DB_TYPE=postgresdb
      - DB_POSTGRESDB_HOST=postgres
      - DB_POSTGRESDB_PORT=5432
      - DB_POSTGRESDB_DATABASE=${POSTGRES_DB}
      - DB_POSTGRESDB_USER=${POSTGRES_USER}
      - DB_POSTGRESDB_PASSWORD=${POSTGRES_PASSWORD}
      - EXECUTIONS_MODE=queue
      - QUEUE_BULL_REDIS_HOST=redis
    volumes:
      - n8n_data:/home/node/.n8n
      - /local-files:/files

  postgres:
    image: postgres:16-alpine
    restart: always
    environment:
      - POSTGRES_USER=${POSTGRES_USER}
      - POSTGRES_PASSWORD=${POSTGRES_PASSWORD}
      - POSTGRES_DB=${POSTGRES_DB}
    volumes:
      - postgres_data:/var/lib/postgresql/data

  redis:
    image: redis:7-alpine
    restart: always
    volumes:
      - redis_data:/data

volumes:
  traefik_data:
    external: true
  n8n_data:
    external: true
  postgres_data:
  redis_data:
Use code with caution.
- Generate a JWT Secret: In your
.env, make sureN8N_JWT_SECRETis not empty. Runopenssl rand -hex 32in your terminal and paste the result there. - External Volumes: Ensure your external volumes (
traefik_dataandn8n_data) already exist by running:bashdocker volume create traefik_data docker volume create n8n_dataUse code with caution. - Deploy: Run
docker compose up -dto apply the changes.
Does the Queue work?
docker logs -f n8n-worker
- What to look for: You should see
Worker started execution <ID>andWorker finished execution <ID>. - If it fails: You will see errors like
Redis connection lostorDB connection refused.
# To see waiting jobs (tasks that haven't been picked up yet)
docker exec -it redis redis-cli LRANGE bull:n8n:waiting 0 -1

# To see active jobs (tasks currently being handled by the worker)
docker exec -it redis redis-cli LRANGE bull:n8n:active 0 -1
bull:jobs:waiting.) docker-compose.yml under the n8n-worker environment section:- Add this:
- QUEUE_HEALTH_CHECK_ACTIVE=true - Then check it:
bash
docker exec -it n8n-worker wget -qO- http://localhost:5678/healthz/readinessUse code with caution.If it returns
200 OK, the worker’s DB and Redis connections are ready.
docker logs -f n8n-worker output. Upgrade to the Latest N8N
Go to the terminal of your N8N Server.
Login as Root.
What version of n8n Am I running?
- Goto the n8n GUI.
- Bottom left hand courner click the ?.
- Click “About n8n.
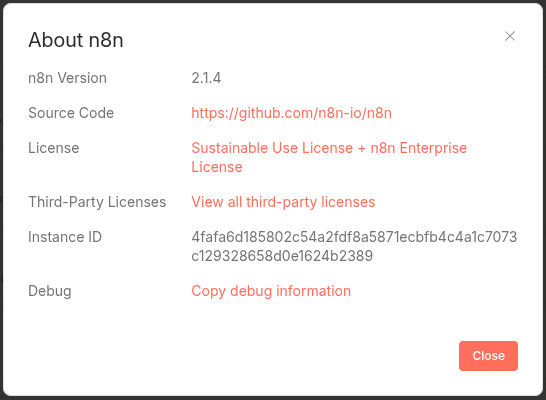
n8n –version
Run each of these commands.
docker compose down
docker compose pull
docker compose up -d
Done.
Now some useful information.
docker compose images
docker images –digests